WooCommerce
Ealyx provides a ready-to-install extension for WooCommerce stores.
The plugin is compatible with HPOS (High-Performance Order Storage) and with both the classic checkout and the Cart/Checkout Blocks checkout.
Before integrating
Requirements
The Ealyx WooCommerce plugin supports the following versions:
| Requirement | Minimum | Tested up to |
|---|---|---|
| WordPress | 6.0+ | 7.0 |
| WooCommerce | 7.0+ | 10.8 |
| PHP | 7.4+ | 8.3 |
PHP curl extension | yes | — |
We recommend PHP 8.0 or higher. The minimums are checked on activation; if they are not met, the plugin does not start and activation aborts with a clear message.
The Ealyx PHP SDK is bundled inside the plugin, so you do not need to run
composer install on your server.
Plugin Installation
Here's how to install the Ealyx plugin step by step.
Before Installation
Request the Plugin
Make sure you have the .zip file of the Ealyx WooCommerce plugin for your
shop.
If you do not have one, please contact your Ealyx account manager.
If you have not been assigned an account manager, request the plugin at:
Request Credentials
Ask the onboarding manager for test credentials or production credentials if all testing has been completed.
Start Installation
Upload the Plugin
To install the Ealyx plugin, navigate to Plugins → Add New → Upload Plugin in your WordPress admin.
Then click Choose File, select the .zip file provided, and click Install
Now.
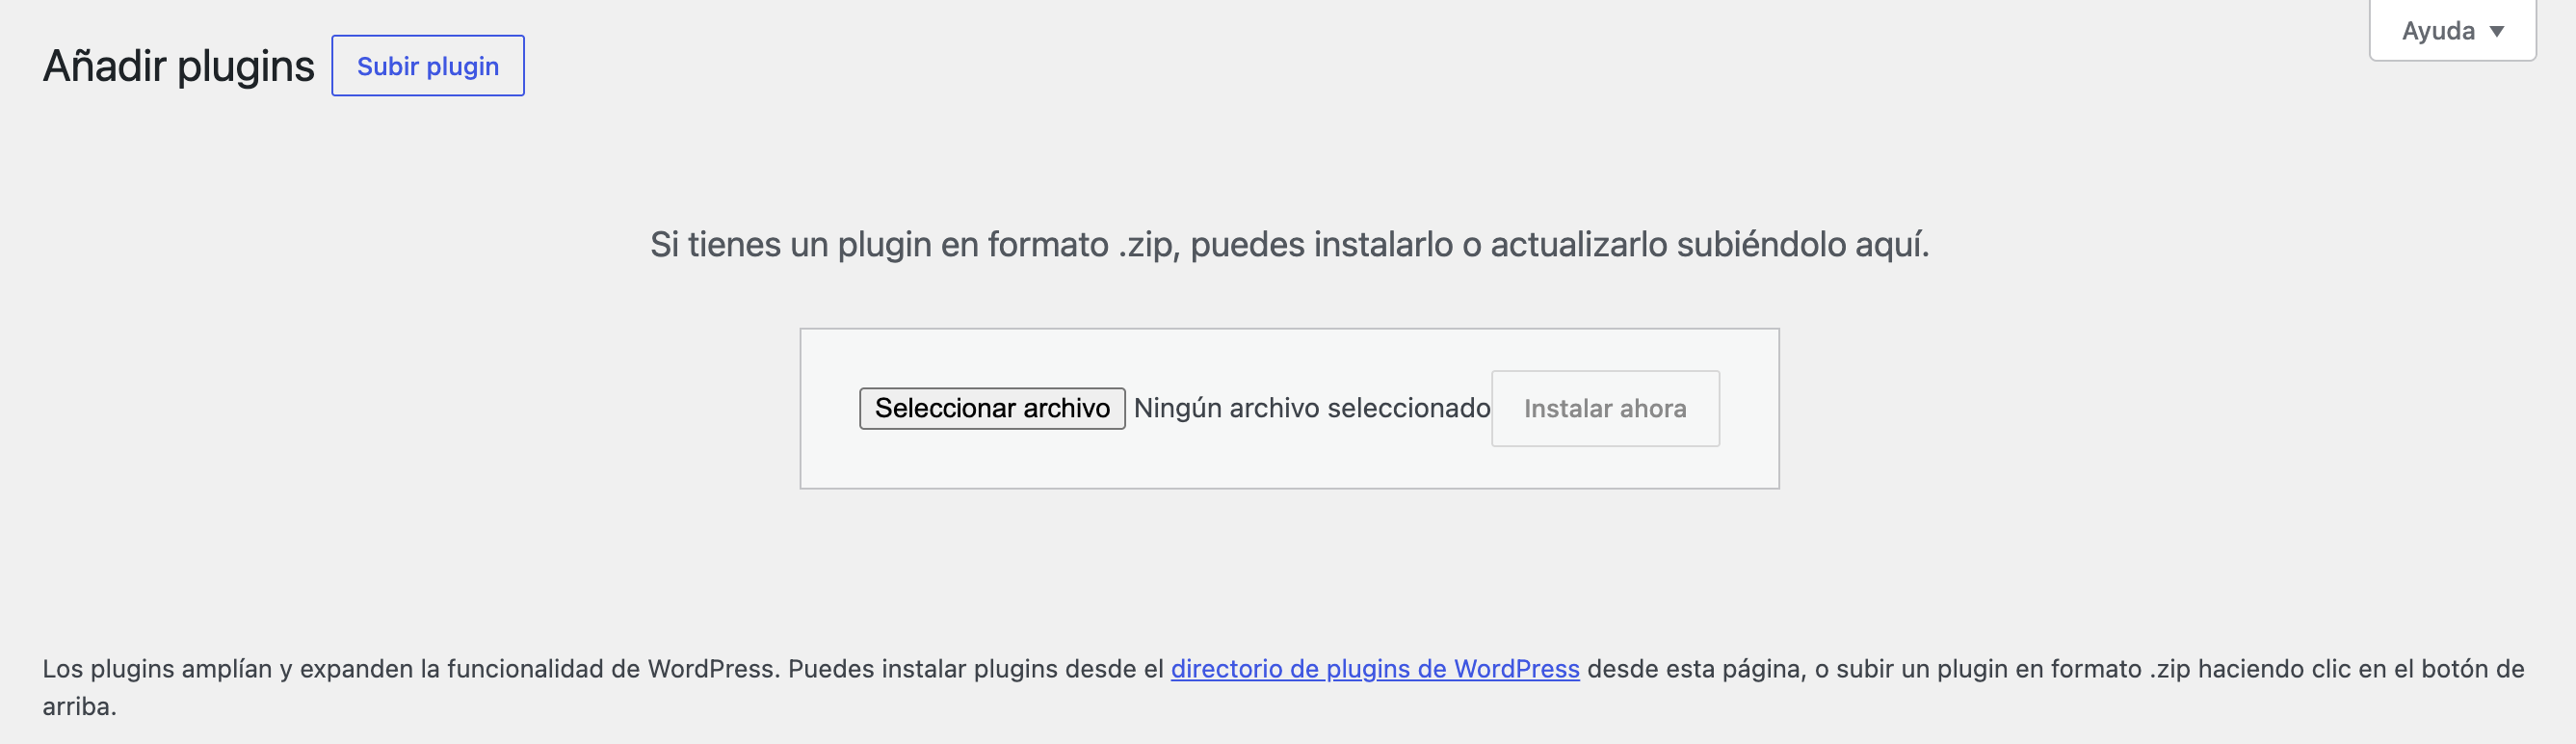
Once the upload is complete, click Activate Plugin. You will then see a new Ealyx menu in the sidebar (and an Ealyx tab under WooCommerce → Settings), together with a notice inviting you to connect your credentials.
Enter Your Credentials
Open Ealyx from the admin menu (or WooCommerce → Settings → Ealyx). Fill in the following fields in the Connection card:
- Account user — your Ealyx account username
- Account password — your Ealyx account password
- Client ID — provided by your Ealyx account manager
- Client Secret — provided by your Ealyx account manager
- Merchant UUID — read-only; it is filled in automatically after you connect
- Live Mode — leave off for test/debug, enable for production
- Environment — Staging (sandbox), Production, or Other (custom URLs)
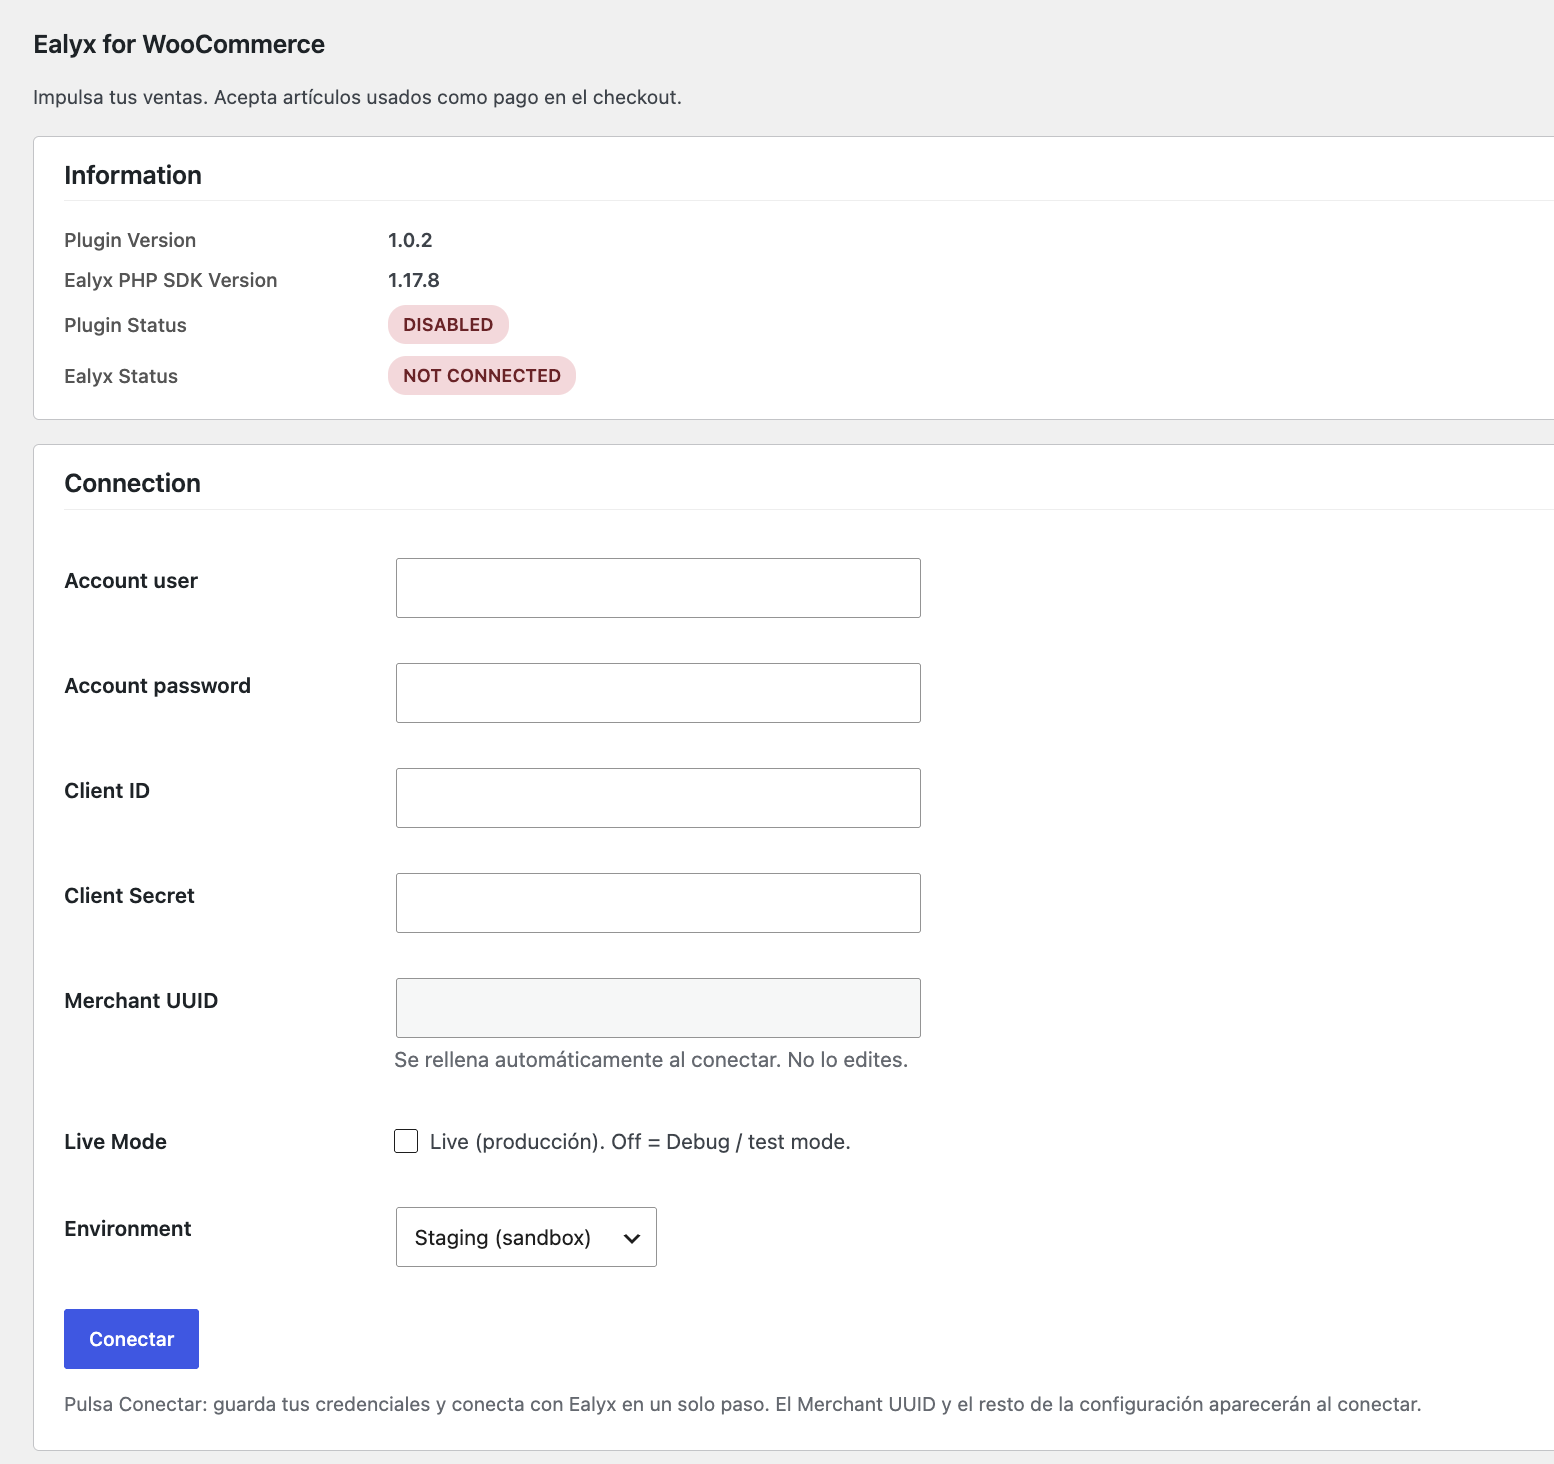
Click Conectar. This button saves your credentials and logs in against Ealyx in a single step. If the login succeeds, the panel switches to Ealyx Status: CONNECTED, the Merchant UUID is filled in, and the Configuration and CSS Selectors sections appear.
You can verify the current status of the plugin from the Information card at the top of the page:
- Plugin Version — installed version of the Ealyx plugin
- Ealyx PHP SDK Version — version of the underlying SDK
- Plugin Status — should show ENABLED after a successful installation
- Ealyx Status — should show CONNECTED after a successful login
Plugin Configuration
Once your credentials are saved and the connection is established, the configuration page expands to show all available settings. You will also see Ealyx Status: CONNECTED in the Information card.
General Settings
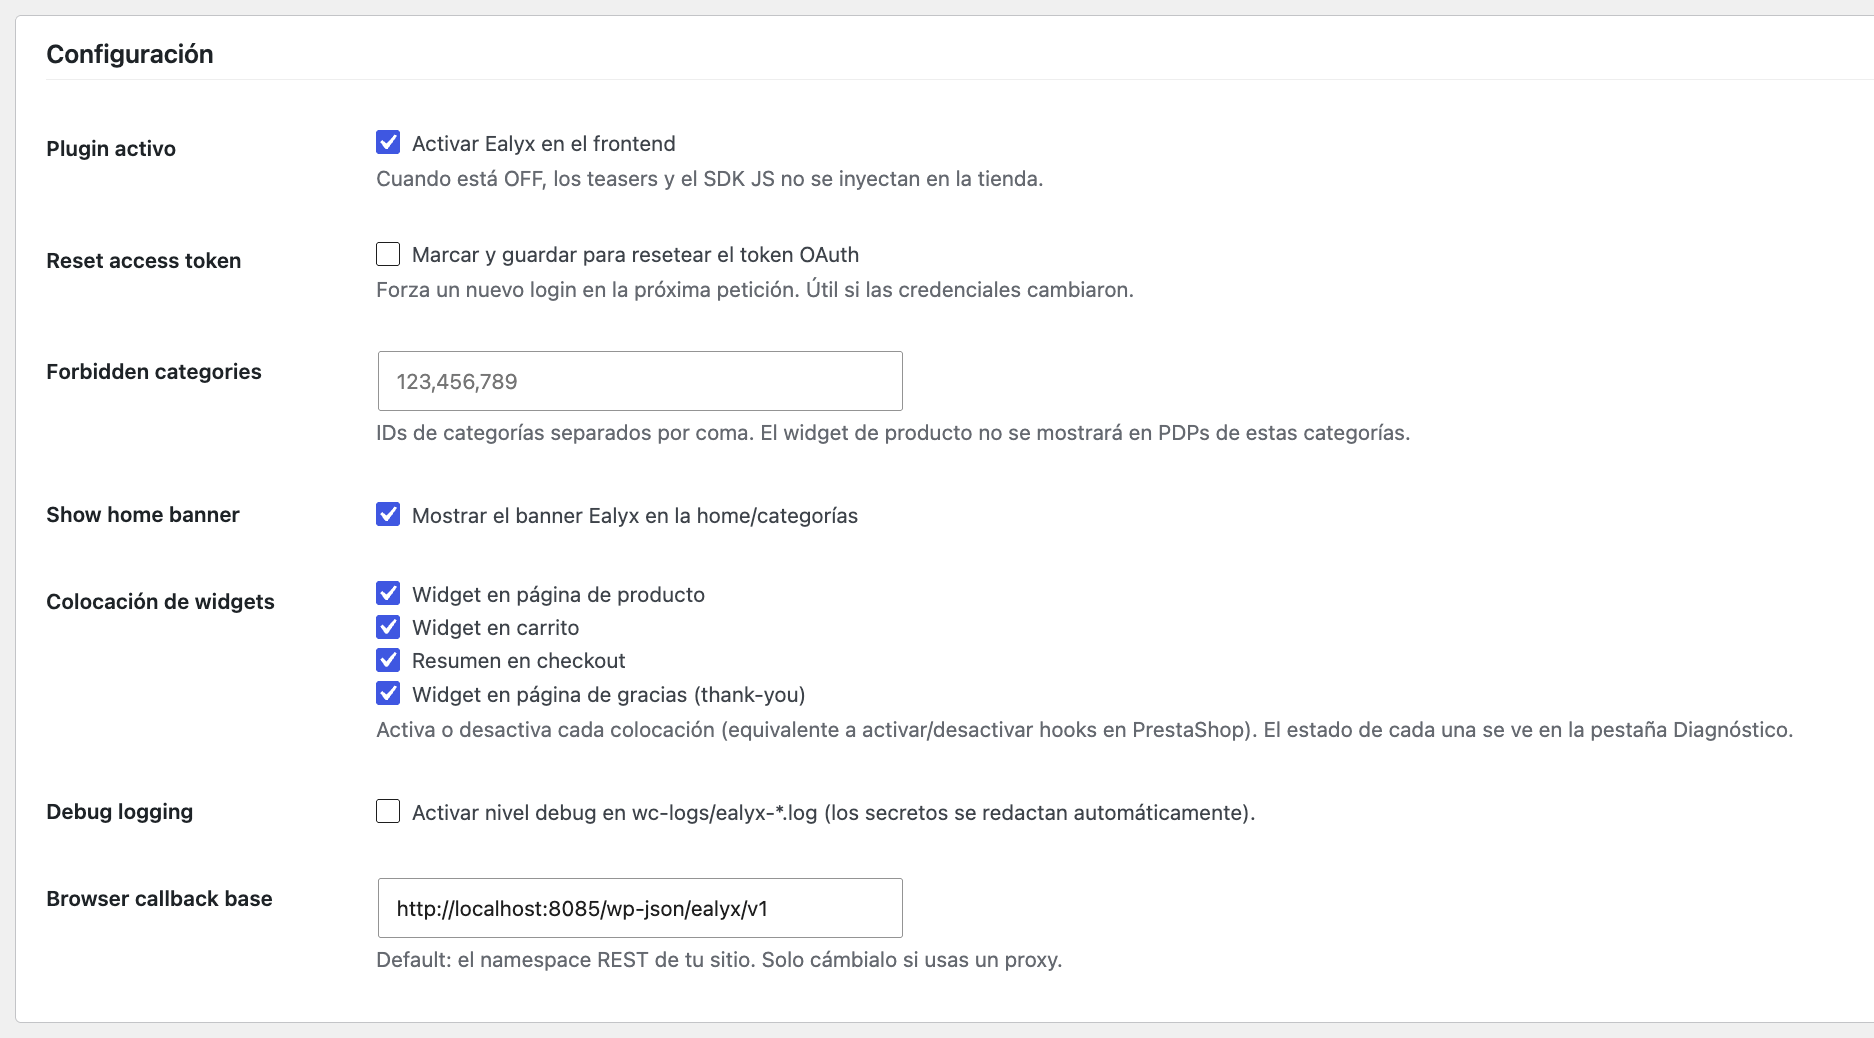
Plugin activo
Master switch for the module. When it is OFF, the Ealyx teasers and the SDK JavaScript are not injected into your store, regardless of the individual placement toggles.
Live Mode
Toggle Live Mode to switch between production and test (debug) transactions. Enable it only when you are ready to go live with real transactions.
Environment
Select the environment from the dropdown — Staging (sandbox), Production, or Other (custom URLs) — according to your current setup.
Reset access token
Enable the Reset access token toggle and save to force a token refresh on the next request. Useful if your credentials changed or you experience authentication issues. The toggle turns itself back off after running.
Debug logging
Enable to write detailed logs to wp-content/uploads/wc-logs/ with the
ealyx- prefix (secrets are redacted automatically). Use it only while
troubleshooting.
Browser callback base
Defaults to your site's Ealyx REST namespace
(/wp-json/ealyx/v1). Only change it if you route requests through a proxy.
Categories Configuration
If there is a category where you do not want the Ealyx widget to be displayed
(previously agreed with Ealyx), add the corresponding category IDs in the
Forbidden categories field, separated by commas (e.g. 123,456,789).
The product widget will not be shown on product pages that belong to these categories.
Display Settings
Show home banner
Enable the Show home banner toggle to display the Ealyx banner on your store's home and category pages.
Widget placement
Select where the Ealyx widgets should appear. Each toggle enables or disables one injection point (the equivalent of enabling/disabling a hook in PrestaShop):
- Widget en página de producto — product page (PDP)
- Widget en carrito — cart page
- Resumen en checkout — checkout summary
- Widget en página de gracias (thank-you) — order-received page
You can review the status of every placement from the Diagnóstico tab (see Widget Placement).
CSS Selectors
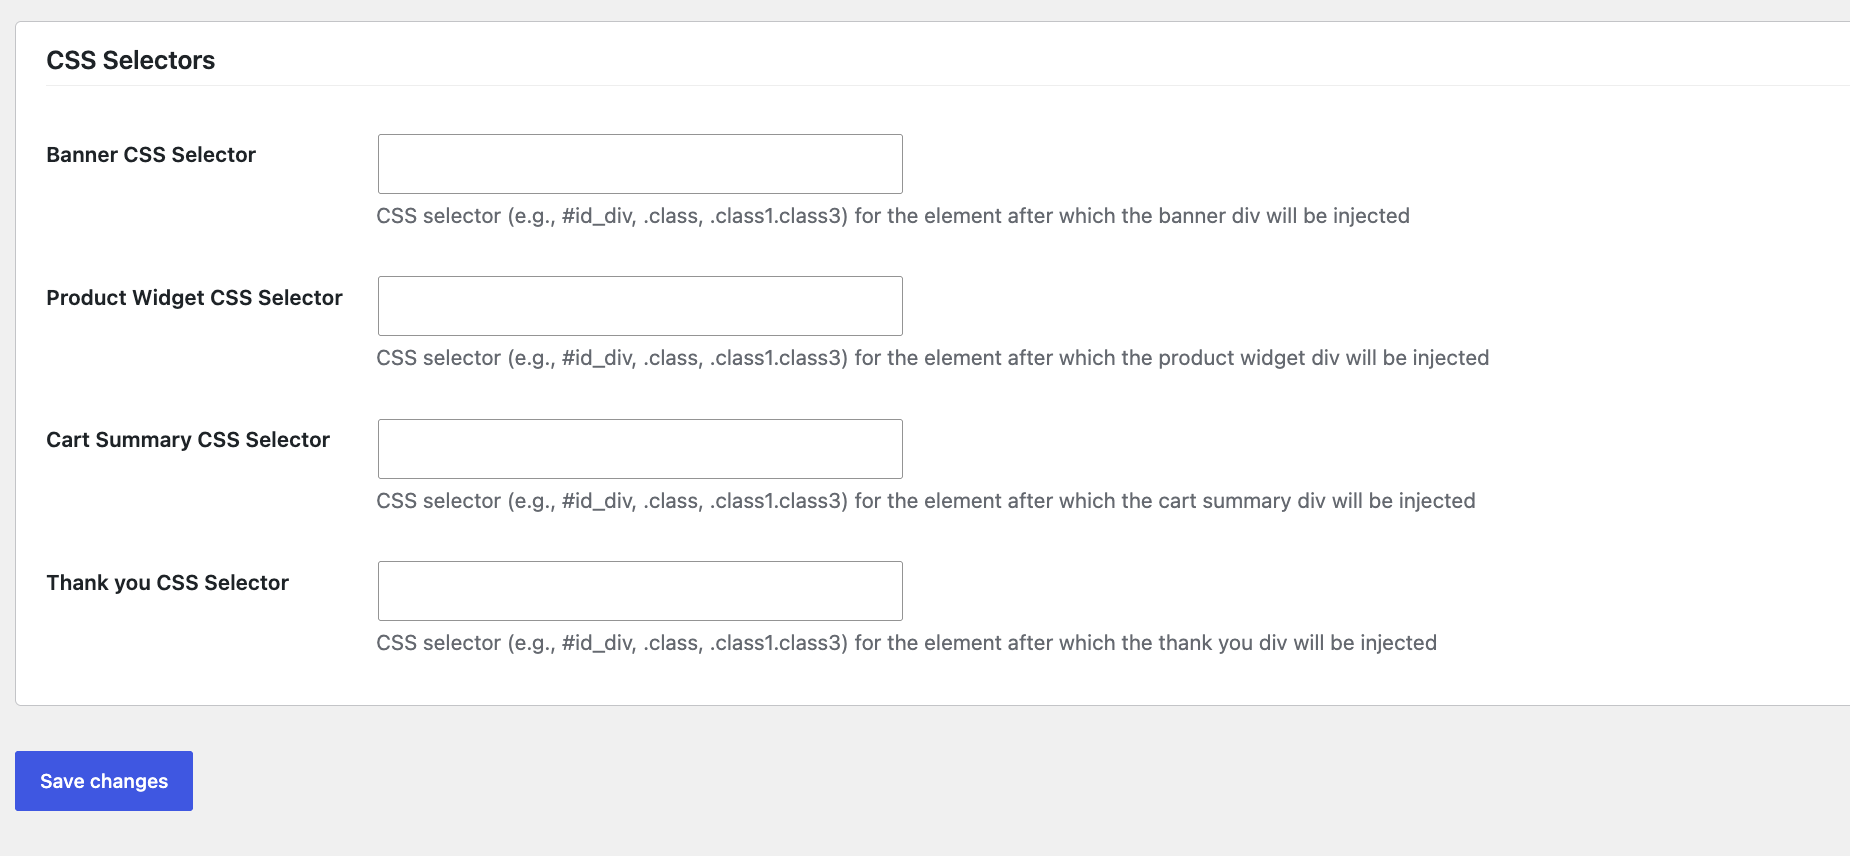
If your theme requires custom placement for the Ealyx widgets, you can specify a CSS selector for each injection point. Leave these fields empty to use the default WooCommerce hook positions.
- Banner CSS Selector — element after which the banner will be injected
- Product Widget CSS Selector — element after which the product widget will be injected
- Cart Summary CSS Selector — element after which the cart summary widget will be injected
- Thank you CSS Selector — element after which the thank-you widget will be injected
Widget Placement (Hooks)
You don't need to do anything — Ealyx has already placed the widgets on the standard WooCommerce hooks to maximise your sales.
Our solution is integrated into the main steps of the purchasing process:
- 🏠 On the Home / category page (banner)
- 🛍️ On the Product page
- 🛒 On the Cart page
- 💳 At the Checkout page
- ✅ On the Thank-you page
You can verify the status of every placement from the Diagnóstico tab. Each row shows the widget, the WooCommerce hook it uses, and whether it is currently Active.
| Widget | WooCommerce hook |
|---|---|
| Producto (PDP) | woocommerce_after_add_to_cart_button |
| Carrito | woocommerce_after_cart_table |
| Checkout | woocommerce_review_order_before_submit |
| Thank you | woocommerce_thankyou |
| Banner (home/categoría) | woocommerce_before_main_content |
Order Status Mapping
Unlike PrestaShop, the WooCommerce plugin does not create custom "Ealyx – …" order states. In the trade-in flow the orders already exist (they are created by your store's own checkout), so the native WooCommerce statuses are enough.
Incoming Ealyx webhooks are mapped to native WooCommerce order statuses:
| Ealyx status | WooCommerce status |
|---|---|
processing | Processing |
payment_review | On hold |
canceled | Cancelled |
pending | (no change) |
Order status changes in WooCommerce are also reported back to Ealyx (only once the purchase has been registered), with a note left on the order:
| WooCommerce event | Ealyx update |
|---|---|
| Completed | SHIPPED |
| Cancelled | RETURNED |
| Full refund | RETURNED |
| Partial refund | PARTIAL_RETURN |
Diagnostics
The Diagnóstico tab is a read-only panel that helps you and the Ealyx support team verify the integration at a glance. It shows:
- Plugin and Ealyx PHP SDK versions
- WooCommerce, WordPress and PHP versions
- HPOS and WC Blocks support
- Current environment and OAuth login status
- Merchant ID and access-token expiry
- Whether the session salt is present
- The last error (if any)
- The widget placement status table (see above)
You can also regenerate the session salt from this tab. Use it with care: regenerating the salt orphans any in-flight trade-ins.
Payment Configuration
The Ealyx Pay payment method is not included in this first version of the WooCommerce plugin, so there is no payment configuration to complete.
In this version, the trade-in acts as a discount/cashback: the shopper values their used product, and then completes the purchase with their usual payment method. Ealyx Pay does not take part in the checkout.
Ealyx Pay support is planned for a future version. When it is released, this section will document the currency, group, country and carrier restrictions, as in the other Ealyx plugins.
✅ Your Ealyx plugin is now installed and ready to boost your store's performance!